Sunday, December 21, 2014

Out of the Kitchen: Beating the Winter Drys!

So, I have dry skin.  All the time.

But in the winter, I have the WORST dry skin of all time ever.

Especially in school, where the heat in my classroom is just this side of Hades. 

So I've found a few products that really and truly help me keep my skin nice and hydrated, and on the plus side, also smell great!

Mario Badescu Facial Spray
This is super affordable at $7.00 a bottle (at Ulta).  I keep this in my desk at work and spray it on my face throughout the day.  It smells lightly of roses, which, yum.  And it won't mess with any makeup you have on your face.  Super refreshing if you need a pick me up!  And very soothing and hydrating!


This one is a bit pricier, at $32.00 a bottle at Ulta (Sephora has this as well).  But worth it.  The coconut water in the primer makes it cooling when you apply it.  It has a thin consistency but feels so hydrating, and it is great under any foundation or other makeup you use.  Also, best name ever.


If you have any other recommendations for a dry skin girl, leave them below!


Sunday, November 23, 2014

Favorite Shakeology Recipes!

Fair warning - these are mostly dessert - y type recipes, because that's how I enjoy my Shakeology :)


Chocolate Peanut Butter
1 scoop chocolate Shakeology
2 tbsp. PB2 or 1 tbsp. natural peanut butter
Handful of ice cubes
8 oz. unsweetened vanilla almond coconut milk


Chocolate Peanut Butter Banana
1 scoop chocolate Shakeology
1 tbsp. PB2 or 1/2 tbsp. natural peanut butter
1/2 frozen banana
8 oz. unsweetened vanilla almond coconut milk


Almond Joy
1 scoop chocolate Shakeology
4 oz. unsweetened vanilla almond coconut milk
4 oz. light coconut milk
1/2 tsp. almond extract
1 tsp. shredded coconut
Handful of ice cubes


Strawberry Banana
1 scoop vegan tropical strawberry Shakeology
1/2 frozen banana
8 oz. unsweetened vanilla almond coconut milk


Chocolate Peanut Butter Cake
1 scoop chocolate Shakeology
1/2 tsp. butter extract
2 tbsp. PB2 or 1 tbsp. natural peanut butter
8 oz. unsweetened vanilla almond coconut milk

Pina Colada
1 scoop vanilla Shakeology
1/2 frozen banana
1/2 cup frozen pineapple
4 oz. unsweetened vanilla almond coconut milk
4 oz. light coconut milk

Enjoy :)

Thursday, November 13, 2014

Skinny Baked Broccoli Macaroni and Cheese

Because who doesn't like comfort food in the winter time?  Okay, it's technically still fall, but it's cold!

I found this recipe on The Comfort of Cooking and really only made a few changes.  One big change I made was using coconut oil as a substitute for butter.

Now.

This didn't make the dish taste like coconut, but it did add a slight sweetness in the background that I felt worked well with the tangy sauce.  And oh yes, I added mustard.  Because you have to add mustard to mac and cheese!

 Skinny Baked Broccoli Mac and Cheese
(Makes 8 1 cup servings)
(Adapted from The Comfort of Cooking)

12 oz. pasta of choice (I used a gluten free which was delicious!)
12 oz. fresh or frozen broccoli spears
1 cup vegetable broth
2 cups skim milk
1/4 cup flour
2 tsp. Dijon mustard
2 tbsp. coconut oil
2 cups reduced fat cheddar cheese (I used a Mexican blend)
1/4 cup panko bread crumbs
Salt and pepper to taste

Preheat oven to 375.  Spray 13x9 pan with cooking spray.

Cook the pasta and broccoli together in the same pot, according to the directions for the pasta.

Drain.

With the pasta and broccoli in the strainer, melt coconut oil.  Add flour and whisk for a minute to lose the raw flour taste.  Whisk in milk and chicken broth.  Bring to a boil over medium - high heat.  Then reduce the heat to about medium and cook for about five minutes, whisking often, until the sauce thickens.  Add mustard, and salt and pepper to taste.

Remove sauce from heat and add in the cheese.  Mix until cheese is blended in, then add pasta and broccoli and mix well.  Transfer the mixture to your baking pan and top with the 1/4 cup of panko.

Bake for 15-20 minutes.  Then broil for 2-4 to crisp up the top.

(P.S. - this is a great make on Sunday dish and have leftovers for lunch for a few days!)

Sunday, November 2, 2014

Fantastic Flatbreads!

I've been a bit flatbread crazy lately.

So I thought I'd compile my inventions into one post :).  Bonus, these are also pretty 21 Day Fix friendly for those who are doing that!  If not, they are delicious nonetheless!

Pumpkin / Turkey / Goat Cheese Flatbread
So it sounds like a bizarre combination but the tartness of the goat cheese pairs perfectly with the sweetness of the pumpkin.

1/2 whole grain Naan (1 yellow)
1/4 cup of pumpkin mixed with 1 tsp. of organic honey (1/4 green + 1 tsp)
2 oz. of shredded / cut turkey breast (1 red)
1 oz. crumbled goat cheese (1 blue)
Sprinkle of dried thyme

Spread the pumpkin mixture on the flatbread and top with turkey and goat cheese and thyme.  Bake at 425 for about 12-15 minutes (I kept an eye on it, when the goat cheese started to brown I took it out).

Serve with a side of veggies for a filling and delicious meal!

The next night I made this same thing, but added a handful of fresh arugula on top after it came out of the oven.  Really brightened up the flatbread and added some nice crisp crunch!

And now the next one....

Turkey / Black Pepper Goat Cheese and Egg Flatbread

1/2 Whole grain Naan (1 yellow)
1 oz shredded or cut turkey breast (1/2 red)
Handful of arugula (1/4 green)
1 oz. goat cheese (1 blue)
1 egg (1/2 red)
Freshly ground black pepper

In a bowl, combine goat cheese and black pepper (to taste).  Spread on Naan and top with handful of arugula and turkey.  Bake at 425 for about 10-12 minutes.

Meanwhile, cook up your egg however you like it.  I just did a sunny side up because I love breaking the yolk over the flatbread.

When the flatbread is done, top with egg and sprinkle a bit more black pepper.  Add a side of veggies to complete your meal!

Monday, October 27, 2014

Want to try Shakeology?

This this is your lucky day!

I have 5 packets of vegan tropical strawberry Shakeology that I'm giving to five lucky people who would love to give this healthy, delicious shake a try!

I've been using Shakeology for over a year, and I have to say, it has helped me cut down on cravings, helped me lose some weight, and more importantly, it's delicious and easy (especially on super busy mornings!)

If you are interested in a free, no obligation sample, please contact me, leave a comment, message me or comment on my Kelly's Kitchen page on Facebook!


Wednesday, October 22, 2014

Baked Pumpkin Donuts

So in case it isn't already fairly obvious?

I love pumpkin.

I literally had something pumpkin at every meal today.  Including one of these as a mid-morning snack.

Yes.  A donut.  As a mid-morning snack.

But this donut is different!  It's pretty low in calories (about 150 calories) and made with much healthier ingredients, and yet still has all that delicious pumpkin flavor.

In researching swaps for this recipe, I found the best news.  You can substitute butter in recipes for coconut oil.  SCORE!  And it's an even swap :)

Also, if you haven't invested in a donut baking pan?  Do it.  I have one for regular size donuts and also have a Babycakes baby donut maker and I love both.  All the goodness, and none of the grease!


Baked Pumpkin Donuts
(Adapted from JessFuel.com)

Makes 6 Donuts

1 cup whole wheat pastry flour
3/4 tsp. baking soda
1/2 tsp. baking powder
1/2 tbsp pumpkin pie spice
2 tbsp. extra virgin coconut oil
1/4 cup brown sugar
1/2 cup pumpkin puree
3 tbsp. egg whites
1/2 tsp vanilla extract
1 tbsp. skim milk

Preheat oven to 350 degrees and spray donut pans.

Combine coconut oil, brown sugar, and pumpkin puree and cream together until smooth.  Add egg whites until combined, then add milk and vanilla and mix.

In another bowl, combine flour, baking powder, baking soda, and spices.  Add this mixture to the wet ingredients and stir until just combined.

Put the batter in a piping bag (or a ziploc with the tip cut off), pipe the batter into the donut pan.

Bake for 10-12 minutes, or until a toothpick comes out clean.  Allow to cool in pan for five minutes before transferring to a wire rack.

(You can top them with a glaze or cinnamon or powdered sugar, would be delicious!)

Sunday, October 19, 2014

Honeyed Goat Cheese and Blueberry Flatbread - 21 Day Fix Friendly!

I'm a sucker for sweet and salty, and so when I saw this recipe on Pinterest, I was more than a little intrigued.  I also thought it would be pretty easy to adapt to the 21 Day Fix!

Naan bread isn't on the list for the yellow containers, however in my research, I've noticed quite a few 21 Day Fix friendly recipes using it.  The consensus seems to be as long as it's got an ingredient list you can read and has real ingredients, go for it.  However, this could also be made with a whole wheat pita!

I swapped the prosciutto for low sodium, fat free ham as well.  Round this off with a side of veggies (I chose a green full of brussel sprouts) and it's a filling and delicious meal!

Honeyed Goat Cheese and Blueberry Flatbread
(Adapted From In Sock Monkey Slippers)

1/2 Naan bread
1 blue of crumbled goat cheese
1 tsp. of honey (instead of using it in coffee)
2 slices (1/3 red) of low sodium, fat free ham
1/4 purple of blueberries
Sprinkle of fresh thyme leaves 

In a small bowl, combine the goat cheese and honey until creamy.  Spread mixture on the Naan bread.  Top with the 2 slices of ham, torn into pieces, and the 1/4 purple of blueberries. Sprinkle on the fresh thyme.

Bake at 475 for 10-15 minutes, until crust is brown.

Containers

1 yellow
1/3 red
1/4 purple
1 blue
1 tsp. honey

Enjoy!

Wednesday, October 8, 2014

Butternut Squash, Brussel Sprout and Quinoa Salad - 21 Day Fix Friendly!

I love fall.

LOVE.

And in the fall, if I'm not eating pumpkin, I'm eating butternut squash.

Browsing Pinterest (when am I not), I found this salad by Iowa Girl Eats and thought it would be easy to make 21 Day Fix Friendly.

And it was!

I made a few substitutions, using coconut oil instead of butter and using 100% pure maple syrup instead of brown sugar - since I don't use it in my coffee as you are allowed to as a "freebie", I figured I'd use it for a recipe.  I also used chopped brussel sprouts instead of shaved for texture.

I also used organic low sodium chicken broth for the quinoa.  In researching, the consensus is on the Beachbody site this is okay to cook the quinoa in since it will end up being a pretty small amount in the portion sizes.

What I did was cook up all the parts necessary and stored them separately, that way I can throw together this portion controlled salad anytime I want!


Maple Butternut Squash, Brussel Sprouts, and Quinoa Salad
(Adapted from Iowa Girl Eats - Link Above!)

1 container of pre-cubed butternut squash
1 bag of brussel sprouts
1 cup of uncooked quinoa
3 tsp. extra virgin coconut oil
3 tsp. pure maple syrup

Preheat oven to 425.  Line baking sheet with foil.  Chop brussel sprouts to desired thickness and spread in a single layer on the baking sheet.  Sprinkle black pepper and a pinch or two of Himalyan pink salt (or sea salt).  Roast for about 15 minutes (or until the edges turn brown and crunchy).

Meanwhile, heat coconut oil in saute pan.  Chop the butternut squash into smaller pieces, and toss into the pan.  Leave over heat for about 20 minutes, or until cooked through, tossing occasionally.  Then stir in the 3 tsp. of pure maple syrup and toss.

Cook quinoa according to package directions.

(Now for the fun part!)

In a bowl, combine 1 yellow of the cooked quinoa, 1 green of the squash, 1 green of the brussel sprouts, 1/2 blue of shredded parmesan cheese, and 1/2 orange of pumpkin seeds.  Toss together and voila!

Now this can be eaten cold or warm.  I warmed it up and the cheese melted and it was amazing!

As a note, the squash made three green containers, so I divided the teaspoons of oil and maple syrup by three.

For each serving - 1 yellow, 2 green, 1/2 blue, 1/2 orange, 1 tsp. (coconut oil)

Filling and super delicious!

(PS - if you aren't doing the 21 day fix, just combine it all in one big bowl with some more cheese and pumpkin seeds - would be an amazing side dish!)

Monday, September 29, 2014

Pumpkin Pasta Bake - 21 Day Fix Friendly!

So, you've been warned.

Around this time of year, I'm a pumpkin - a - holic.

From savory to sweet, it's all about pumpkin for me.

So thanks to Mom getting me a little pumpkin cookbook, I found this recipe and realized it was really quite 21 Day Fix friendly!

It's from a cookbook called Favorite Brand Name Recipes - Pumpkin! (I'm pretty sure it's one of those checkout aisle at the grocery store books).  I really didn't change much except I used regular tomato sauce instead of marinara. 

I also measured out all of the ingredients in the fix containers so I could accurately (or at least as close as possible) give you the Fix container servings.

This recipe makes 8 servings, and I used the green container to measure a serving.  I figured that was what Autumn recommended for lasagna in the book, and this is a fairly close idea to lasagna.

One last note, turkey sausage isn't in the book, but I researched on the Beachbody website and the mods on the board there said it could count as a red if you checked the ingredients and it was clean.  The sausage I got was meat, water and spices so I figured we were good :)

So here goes!


Pumpkin Pasta Bake

Organic coconut oil spray
5 links of lean spicy turkey sausage out of casings ("fried up" those equaled three red containers)
1 minced garlic clove
2 1/2 greens of tomato sauce
1 1/2 greens of 100% pure pumpkin puree
1 blue of shredded parmesan
10 yellows of cooked whole grain pasta (I used a quinoa / brown rice blend!)
3 blues of shredded part skim mozzarella cheese


Preheat oven to 375.

First up, cook the pasta according to package directions.  Drain.  Measure out 10 yellow servings (the package made more, I saved the rest in a separate container).

In the same pasta pot, spray with coconut oil and "fry" up the turkey sausage until cooked through (I actually measured this out after it was fried for three containers, just in case, then put it back in the pot).  Add the minced garlic and let cook for about a minute.

Stir in tomato sauce and deglaze the pan.  Then stir in the pumpkin and half of the parmesan cheese.  Stir well, then add in the pasta. 

Spoon into a sprayed 9x13 baking dish.  Sprinkle with the rest of the parmesan and the three containers of shredded mozzarella.

Bake for 15 minutes (you can cover, but I found I didn't need to!) or until bubbly.

Now for the containers (this is as mathematically as close as I can figure out, it might be a little high on the red but if it is it's only a slight amount).

1 green container serving = 1 1/4 yellow, 1/2 blue, 1/2 green, 1/2 red

As a side note, I had this for dinner with a leftover green of roasted veggies and it was a perfect dinner!  Would also be great with a salad!

Wednesday, September 10, 2014

21 Day Fix: Breakfast for Dinner!

Honestly, I could eat breakfast all day every day and be quite happy.

So after a long day at work, breakfast for dinner sounded divine.


Mmmmm.  And can you believe 21 Day Fix friendly!

I took 1 small gold potato (1 yellow) and chopped it small.  I sauteed it in 1 tsp of olive oil and 1 clove of garlic.  As it cooked (about 10 minutes overall), I sprinkled some black pepper and smoked paprika (about a 1/4 tsp.)  on it.

In another pan, I had 1 green container of yellow squash and zuchinni slices "frying" up in some organic canola oil spray with a sprinkle of pepper.  I added two beaten eggs (1 red) and scrambled it all up, adding 1 blue of shredded reduced fat cheese at the end.

It was so filling and delicious!  Made me wish for breakfast all the time!

Sunday, September 7, 2014

21 Day Fix - Peanut Butter and "Jelly" Overnight Oats

I love me some oatmeal.  Especially in the fall.

A few years ago I discovered overnight oats, and became an instant fan.  As I was mulling over recipes to try and "makeover" for 21 day fix, this one came to me and it's perfect.

This is just one of many variations you could do.  Overnight oats are basically whatever you want them to be.  To make them 21 day fix friendly, I simply swapped out the milk for water, and honestly you couldn't even tell the difference.

This is a great for a quick lunch on the go (especially if you have mason jars around, perfect container for it!), and it's really easy and fast to make.

Of course, there isn't really jelly, but I always loved peanut butter and strawberry jelly, so this is my little twist on that.

Not to mention, delicious and filling!


Peanut Butter and "Jelly" Overnight Oats

1/2 yellow of oats, uncooked (I do end up counting this as a full yellow though because of the way oats are measured on 21 day fix!)
1 red of greek yogurt
1 purple of chopped strawberries
1/2 cup water
2 tsp. natural creamy peanut butter
Stevia to taste (or a tsp. of vanilla extract)

Combine all ingredients in mason jar, close and shake!  That's it!  Put it in the fridge overnight and enjoy the next morning!

Monday, September 1, 2014

Toasted Coconut Pineapple Pie

What better way to end summer than a delicious, creamy, summery pie?

I had found this recipe on Pinterest, and did a bit of tinkering with it. 

And it was delicious!   And super easy to make.

One change I made was just using a storebought graham cracker crust.  In a perfect world, I would have had time to make my own.  Alas.

The consistency was a bit, well not as "set" as I would have liked (probably because I didn't use whole milk), but it was delicious.  I think next time I make it I would probably freeze it and serve it that way.  It would also be great as a parfait layered with graham cracker crumbs!


Toasted Coconut Pineapple Pie
(Adapted from Mostly Homemade Mom)

1 graham cracker crust
1 box of sugar free instant vanilla pudding
1 box of instant coconut pudding
2 cups of almond coconut milk
1 cup of shredded coconut
1 container of light whipped topping, thawed
1 8 oz. can of crushed pineapple, drained


Heat oven to 350.  Spread the coconut on a baking sheet and toast for about 2-5 minutes (keep an eye, it can burn pretty quickly!).

Pour the pudding mixes into a bowl and combine.  Then, add almond coconut milk and and stir until pudding thickens.

Fold in the drained, crushed pineapple, 3/4 of a cup of the coconut, and the whipped topping.

Pour into pie crust, top with the remaining coconut.  Allow to chill for at least an hour in the refrigerator.

Enjoy!

Friday, August 29, 2014

3 Day Refresh Results and Thoughts

And done!

The results?

Down 4.4 pounds and 1 inch!

Not bad for 3 days.

The big question, was I hungry?

Day 1?  Yes.

Day 2?  MUCH easier.

Day 3?  A little harder than Day 2 but easier than Day 1.

Day 2 was by far the best day for me.

Now it helped that I was extremely busy this week with prepping my classroom.  Even when I got home I did work so I was constantly occupied.

And to be honest, I did have more coffee than they recommended.  Because let's be honest.  This is me and I basically run on coffee.

However, the rest I followed.

I also discovered a new favorite side dish!  Which, on this wasn't a side dish but will be from now on!


Coconut oil steamed broccoli!  Which is really just steamed broccoli tossed with 1/2 a tsp. of coconut oil and Himalayan pink salt.

So overall I thought the program was worth it.  It's only 3 days, and you definitely feel a lot less bloated / puffy once it's done.  And I feel ready now for the upcoming 21 day fix (which, if you missed it, I will be starting a challenge group on 9/15 so message me or comment if you are interested!)

Wednesday, August 27, 2014

Back to School Challenge Group!

Fall is almost here!  Which means the season of pumpkins (and pumpkin lattes) and holidays kicks off.  Want a head start on some healthy habits before the holiday hits?

I'm starting a challenge group on September 15!  It will be a private Facebook group that offers motivation, tips, tricks, and of course, recipes!  For those doing 21 Day Fix and / or Shakeology who are interested in joining this 3 week accountability group, either message me or leave a comment!  Also, if you are interested in more information about either program, message me or comment as well!


For more information on the programs or to order, you can follow this link :)

Challenge Pack

Tuesday, August 26, 2014

3 Day Refresh - Day 1

All the details!

Word of warning, definitely do this on a day when you are busy.  If I had been sitting home it would have been a huge challenge not to snack!

So I started off with a vegan chocolate shakeology with 1/2 a banana.  I had been anxious to try the vegan chocolate and I really liked it! 

My one slight issue is that I'm not a huge fan of using water with Shakeology, but it's temporary so it was fine.

I had a cup of green tea about mid-morning.

Then the Fiber Sweep drink.  Another word of advice: blend it with ice.  It's a funky consistency but blending it with ice makes it better.  It has a slight lemony taste.

A few hours later: lunch!


2 tbsp. of hummus, 5 baby carrots, and the vanilla fresh shake blended with ice and cherries. 

Another cup of herbal tea in the afternoon, and when I got home from my classroom, I snacked on a cup of cucumbers and 2 tbsp. mashed avocado.


This was the toughest time of day for me, because I was home and I'm a snacker.  But I muddled through (with lots of water!).

Dinner was the optional cup of organic veggie stock, along with the recipe for steamed kale with pine nuts and lemon juice, followed by another vanilla fresh shake.

My main issue is the water with the Shakeology because I normally use unsweetened almond milk, but it was still good, just not as thick or creamy I found personally.

So day 1 is almost done, let's see how day 2 goes tomorrow!

Sunday, August 24, 2014

Sample Meal Plan - 21 Day Fix (1500 calorie range)

Thought this might be helpful!  You can adjust according to the calorie level you are on :)


Breakfast

Chocolate Shakeology (1 red)
½ banana (1 purple)
Coffee


Mid morning snack

1 slice multigrain bread (1 yellow)
2 tsp. sunflower seed butter (2 tsp.)
Baby carrots (1 green)


Lunch (Avocado Egg Salad Wraps)

2 corn tortillas (1 yellow)
2 hard boiled eggs (1 red)
Arugula (1 green)
Mashed avocado (1 blue)
Strawberries (1 purple)


Mid Afternoon Snack

Apple (1 purple)
Raw sunflower seeds (1 orange)


Dinner

Grilled chicken breast (1 red)
Roasted brussel sprouts (1 green)
Brown rice (1 yellow)
Roasted zucchini (1 green)


Snack
Greek yogurt ( 1 red)
2 tsp. natural peanut butter (2 tsp.)


Totals – 4 red, 3 yellow, 3 purple, 4 green, 1 blue, 1 orange, 4 tsp.

Tuesday, July 29, 2014

Coconut Oil Popcorn for 1

I'm a snacker.  I've always been a snacker.  I love to snack.

And popcorn has always been one of my go to snacks.  For a long time, it was the 94% fat free microwave version.

But in reading the labels and reading online, I saw how many chemicals were actually used in making it, so I searched for a better alternative.

The answer?  Coconut oil.

I'm a fairly recent convert to coconut oil, mostly using it in my coffee as well as using the spray to "fry" an egg or some veggies.  I really love the flavor it gives.

So I turned to the trusty internet and found a lot of recipes for coconut oil popped popcorn.  Only the recipes made huge, and I mean huge, family size amounts.

Which, I would definitely eat.  However, I decided to play around and see if I could come up with a friendlier, single serving ratio. 

So here it is!  But know that you can definitely double if you are making it for more than one person!

In a small saucepan, melt 1 tsp. of coconut oil.  Place 2 unpopped kernels of popcorn in the oil, and cover the pot partially with a lid.  Listen for the 2 unpopped kernels to pop - this will let you know the oil is hot enough for the rest of the kernels.

Remove the 2 now popped kernels and put 3 tbsp. of unpopped kernels in the heated oil.  Cover the pan completely with the lid and shake slightly. 

Then let it pop!  You don't have to watch it but don't go too far, you need to listen.  Mine usually takes about 2 minutes, but when you hear the popping start to slow down, get ready to remove it from the heat.

The result?  Delicious, fluffy, healthy popcorn!


I always put it in a smallish bowl too, so it looks really big :)

As for toppings?  Well I try to keep it healthy, I may spray a bit of coconut oil spray on it, and then I love to sprinkle some malt vinegar - a great substitute for my favorite salt and vinegar potato chips.  I also really love sprinkling some tabasco over the top for a spicy kick!


Sunday, July 27, 2014

Tri Color Orzo Salad

Who doesn't want an easy, light, and non-mayo salad option to bring to a summer party or BBQ?

This recipe is actually adapted from Giada DeLaurentis' recipe.  I made a few changes, using less olive oil (much less!) and substituting goat cheese for the ricotta salada because I could never find it!  I also usually leave the pine nuts on the side since you never know who is going to have allergies at a party you are attending!  I also up the greens, because why not?

Side note:  Last time I made this I actually used dried basil since I couldn't find fresh anywhere, and it was still delish so no worries about having to substitute!

Tri Color Orzo Salad

Ingredients
1 pound orzo pasta
3 TBSP. extra virgin olive oil
3 cups (or 1 bag) of baby arugula
3/4 cup crumbled goat cheese
1/2 cup dried cherries
12 basil leaves, torn 
1 lemon (for the juice!)
Salt and pepper to taste


Cook the orzo according to directions on the box.  Drain and rinse with cold water.  While it is still cooling, transfer to large serving bowl, drizzle with olive oil and stir.  While it cools, stir it every once in a while to prevent sticking.

Once it cools, add in the bag of arugula and toss.  Then add in the basil, goat cheese and dried cherries.  Squeeze fresh lemon juice over the top and season with salt and pepper to taste.

(This is also a great recipe to double and triple for big crowds!)


Saturday, July 19, 2014

Crockpot Balsamic Chicken - 21 Day Fix Friendly!

The crockpot is my best friend.  Especially when I'm doing the 21 Day Fix, where prep is key.  Throwing something in the crockpot on a Sunday and having it for the week makes life a lot easier.

I knew I wanted a protein for the week, something I could eat on its own or toss on a salad or in a wrap.  And so this recipe was born.

I used a pound of chicken breast, but you could just adjust the spices up if you wanted to make more.

First things first, I sprayed the crockpot with organic canola spray.  Then, just lay the chicken breasts on the bottom.

Then I sprinkled a 1/2 tsp. of minced garlic, 1/2 tsp. of dried rosemary, a pinch of kosher salt and a 1/4 tsp. of freshly ground black pepper.


Then I added 1/2 cup of balsamic vinegar.


Turn the crockpot on high and cook for about 2 and a half hours.  I flipped the chicken about an hour and a half in.


After about 2 and a half hours, I turned the crockpot down to low and shredded the chicken (it was so tender, it took about 2 minutes!).  Then I let the shredded chicken sit in the vinegar mixture on low for another half hour.  I also added about 2 tbsp. more of the balsamic vinegar.

And that's it!  Fill a red container with it and use it to top salads or just eat on its own!


Recipe

1 pound boneless, skinless chicken breasts
1/2 tsp. of minced garlic
1/2 tsp. of dried rosemary
1/2 cup balsamic vinegar
pinch of kosher salt
1/4 tsp. of freshly ground black pepper

Spray crockpot with cooking spray.  Combine all ingredients and cook on high for 2 - 2/12 hours.  Flip chicken about halfway through.  Turn crockpot to low and fork shred chicken, allowing to cook for another 30 minutes.

Wednesday, July 16, 2014

A Chocolate Covered Cherry - For Breakfast?

Sounds crazy right?

And yet, this new Shakeology combo I tried the other day?  Totally tasted like it.  And yes, also 21 Day Fix friendly!

As I've said before, I make my Shakeology with coffee since those yellow containers are precious to me, too precious to swap out for almond milk, but you could totally do this with whatever you make your Shakeology with. 

I used a Double Chocolate Truffle K-Cup (brewed the night before and refrigerated over night), 1 purple container of frozen dark, sweet cherries, 1 tsp. of pure vanilla extract, 1 scoop of chocolate Shakeology, and a handful of ice cubes.

Like having candy for breakfast, only totally healthy!


Monday, July 14, 2014

21 Day Fix Helpful Hint - Roast those Veggies!

I'm not a huge veggie eater.  I wish I liked them more than I do, but the ones I do like, I like a lot, so I guess there is that.

One of the things I do to help set myself up for the week is to prep them ahead of time.  And my favorite way to do that is to roast them.

Roasting your favorite veggies brings out great flavor and makes them a little crispy as well.

I've roasted all sorts - my favorites being brussel sprouts, asparagus, zucchini and yellow squash.

Generally what I do is spray a baking sheet with some coconut oil spray and preheat the oven to about 425.  Then I lay any veggies I want in a single layer, spray a bit of coconut oil on top, and bake for about 20 minutes, flipping them once.

Once they are roasted, I store them in airtight containers and then I have them for the week for anything from a side dish, to a flatbread, or an egg scramble.

An example?  My flatbread pizza!


Saturday, July 12, 2014

The Love List: The AquaZinger

Confession.  Not a water lover.  Sure, I drink it (especially when running), but it isn't my favorite at all.

And yet I know, to continue being healthy and doing any of the Beachbody programs I do, I need to do just that.

So, while shopping for Father's Day, I had come across this water bottle called an AquaZinger.  Basically the claim was you could make your own water infusions using fresh ingredients and not have all the artificial sweetener and chemicals you may find in a lot of flavored waters.

Well I picked on up for Dad for Father's Day, and finally picked myself up one at the end of the school year.

I have to say?  I'm sold.  It's a nice looking water bottle, but more importantly, it really does work.


So basically step one?  Take it apart.


As you can see in that bottom piece, there are metal spikes that stick up, and on the corresponding top there are spikes that go the opposite way.

So, you take whatever fruit (or veggies or herbs) that you want and fill that bottom cup.


Then place the top piece on an turn several times to mash up the fruit and get those fresh fruit juices out.


Then screw that whole portion on to the top of the bottle, fill with water, and give it a shake.  

Now, this is definitely something I do ahead of time.  The longer it sits, the better and more flavorful the water is.  So I tend to make it the night before, and then grab it chilled out of the fridge before work the next morning.

So far, I've tried both raspberries and blueberries and have loved both.  It definitely makes drinking that water more enjoyable.

For those interested, I've seen it at Brookstone, but I just ordered mine on Amazon.

Who knew you could make water healthy AND exciting?


Tuesday, July 8, 2014

Turkey and Berry Salad - 21 Day Fix

Salads are tough for me.

I like them out at a restaurant, but that's because they are usually loaded with things that aren't the healthiest.

I'm not a huge veggie fan either, which is a whole other post entirely. 

So when I make salads at home, I tend to veer towards fruit.  Because fruit?  I love fruit.

Tossed this quick salad together after summer school and it was delicious and filling!


The Breakdown:

2 green - filled with arugula
1 purple - mixed berries (I used blackberries, blueberries, and raspberries)
1 red - leftover baked turkey breast, shredded
1/2 blue - crumbled goat cheese

For the dressing, I drizzled some raspberry infused balsamic vinegar over the whole thing.  Delicious and easy!  (And a great use for any leftover protein!)

Saturday, July 5, 2014

Shakeology Review

I honestly wasn't sure what to think about the claims Shakeology made when I first started researching it.  I'm a vet of protein shakes, it's an easy quick breakfast that I can drink while getting ready for work.

But one day I bit the bullet and ordered a bag of the chocolate.  Within about a week?  I was a believer.


First and foremost for me?  It tastes great.  And there are tons of availabe recipes online where you can mix up the variations (I also have a few that I've tried that I'll be posting soon!).

But what really impressed me was how filling it is.  I have my shake, during school at least, at around 6 in the morning.  Snack time with the kids is around 10.  And I have to say, that shake kept me satisfied for those four hours.

I felt more energetic and definitely had less cravings for sweets.

Now I can't imagine a day without it!  On the weekends I usually have it as a post - workout meal or lunch since I have the time to cook a good breakfast on the weekends.  But regardless, it really is a delicious and healthy way to get a lot of nutrients into one power packed drink.

Full disclosure - the chocolate is definitely my favorite.  I tried the vanilla and while I liked it, the chocolate was what I ended up putting a monthly order on.  I also tried the strawberry but found it to be a tad too sweet for me.

I definitely credit Shakeology with my success in getting healthier and more fit.  If you have any questions about it, let me know!

Friday, July 4, 2014

21 Day Fix - Private Challenge Group Forming!

Interested in slimming down and feeling great for the rest of the summer? There's still plenty of it left!

I will be starting a private challenge group on Facebook for anyone interested in doing either Shakeology or the 21 Day Fix! Get motivation, recipes, meal ideas, and more!

As a veteran of 1 round of the 21 Day Fix, being in the challenge group helped me stay focused and get some great ideas and motivation. 3 weeks later I am one clothing size smaller!

If you are interested, private message me and I will add you to the group! The group will be starting Wednesday July 9! If you'd like more information on the 21 Day Fix or Shakeology I can answer those questions as well!

Wednesday, July 2, 2014

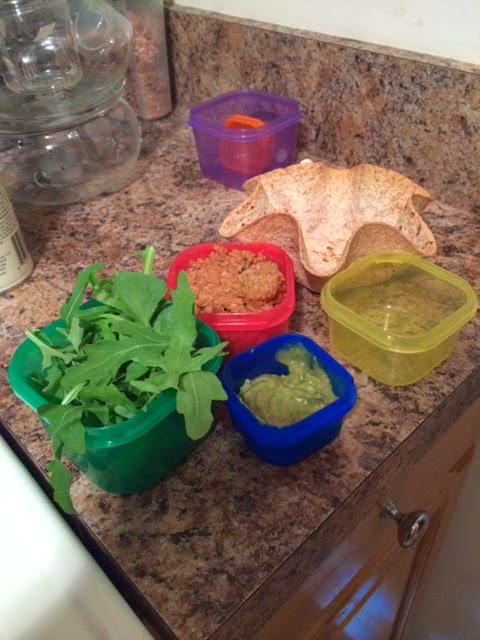
21 Day Fix Friendly Taco Salad


Because who doesn't love a good taco salad? 

But let's face it, at a Mexican restaurant, the cheese, guacamole, and shell alone would put you over the top. 

So how to make a good one at home?

This little beauty!

It's an EZ tortilla pan (thanks Mom!).  Basically, you preheat your oven to 375 degrees, pop your tortilla of choice in the bowl, and bake it anywhere from 10 - 15 minutes depending on your desired level of crunch.

No oil, no fat, nada.  Just a crispy tortilla shell to fill with good stuff!

What did I fill mine with?

Crockpot taco turkey (basically 93% lean ground turkey - I made three pounds so I would have it! -  in a crockpot with 2 cups of water and 3 tbsp. of chili powder and 3 tbsp. of cumin and cooked it on high for about 3 hours and low for about another hour). 

I also added some arugula and avocado.


This delicious recipe breaks out like this...

1 yellow - 6 inch flour tortilla
1 red - crockpot taco turkey
1 green - arugula
1/2 blue - mashed avocado with a squeeze of fresh lime juice

A delicious and filling lunch!  I also rounded it out with a purple of some mixed berries.  Easy to make and it feels like a treat!

Wednesday, June 25, 2014

Sweet Potato "Hash" with Eggs - 21 Day Fix


One of my favorite meals of the day is breakfast.  So naturally, I have breakfast for dinner.  A lot.

I used to make a version of this "hash" which I loved, and really all I did was modify it a bit to make it a little more fix friendly.

For the sweet potato, I sliced it then and roasted it with 3 tsp. of olive oil (it ended up making three yellow containers) and 2 tsp. each of cumin and chili powder.  Lay on a baking sheet and roast at 400 for about 25-30 minutes (I kept an eye on it).


This is also a great "clean out your fridge" dish.  So basically the breakdown is this.

1 red - 2 poached eggs
1 yellow - roasted sweet potatoes
1 tsp. - olive oil the potatoes were roasted in
1 green - filled with any veggies you have on hand
1/2 blue - shredded cheese of your choice (I used a reduced fat mexican blend)

To poach the eggs, I used a trick I found on Pinterest.  Basically put a tbsp. of water in 2 muffin tin cups and crack an egg.  Bake in a 350 oven for about 15 minutes.  They won't be extremely runny yolk-wise but it was so easy and they were delicious!

For the rest, I simply "fried" up the sweet potatoes in some coconut oil spray and added in the veggies.  Once everything was heated through, I tossed in the cheese to melt it a bit.  Put it all on a plate and top with the eggs!


Super filling and delicious!


Monday, June 16, 2014

Chili Roasted Butternut Squash Salad - 21 Day Fix

Butternut squash.  Mmmmmm.

However, this time of year, not the easiest to find.  What's an aspiring healthy cook to do?

Improvise!

Frozen butternut squash chunks it is.


Basically, 1 bag of frozen butternut squash (keep it frozen!), 1 tbsp extra virgin olive oil, 2 tsp. of chili powder and 2 tsp. of cumin, a little kosher salt and black pepper.

Preheated the oven to about 450 and bake for about 20 minutes (I kept an eye on it, that seemed to do it).

Now, the downside of the frozen variety is that it isn't going to get as crispy.  However, it tastes delicious!

And now to put it all together.


So basically:

2 Green: 1 filled with baby arugula and 1 filled with the roasted butternut squash
1 yellow:  black beans
1/2 blue: crumbled goat cheese
1 tsp.  - extra virgin olive oil (the butternut squash as a whole made 3 servings so I'm counting 1 tsp. per serving).


A quick and healthy lunch to go!  Rounding it out with a purple filled with mixed berries (blueberries and blackberries).

Wednesday, June 4, 2014

Crockpot Buffalo Chicken - 21 Day Fix Style!

I mean, because who doesn't love buffalo chicken?  Except for the fact that it's not exactly calorie friendly.  But yeah, still good.

So I challenged myself to lighten it up.  Ended up with about a pound of boneless, skinless chicken breast, 1 red container of 2% greek yogurt, and a small bottle of tabasco.  Threw it all in a crockpot and cooked it on low for about 3 and a half hours.  After about three hours, I went in and shredded it and let it sit for a bit longer.

Not going to lie, I didn't even miss the ranch dressing or the cream cheese / sour cream.

When I went to use it in my lunch, I didn't fill the red container the entire way with chicken, allowing some "room" for the greek yogurt I used.  I would say that the entire recipe made at least 7 servings in a "red" container, so the greek yogurt in each serving is probably minimal.

So to make a healthy lunch for the week, check it out below!

1 red - crockpot buffalo chicken
1 green - steamed mixed veggies
1 yellow - quinoa
1/2 blue  - crumbled goat cheese

Delicious and filling!

Sunday, June 1, 2014

It's All About the Prep....

So, in starting (and continuing) the 21 Day Fix, one thing I have learned is that it's all about the prep.  If you are prepared, the program itself is very user friendly and easy to do.

But the prep.

So what I have started doing is setting aside Sundays to really set myself up for the week.  The weeks are CRAZY for me, between work and tutoring and anything else I have going on.  Most days I leave my apartment at about 7 and don't get home until about 6.  So having things ready to go is key for me.

One strategy I use is making grab and go snack bags.  Pictured above are "green" container portions of cucumbers and baby carrots.  This makes it easy at 5:30 in the morning when I'm making my lunch to just toss a couple of bags in there so I'm set up for the day.

Another thing I do in utilize my crockpot and rice cooker.  Often on Sundays I'll make a meal in the crockpot that can work as lunches during the week, and steam either brown rice or quinoa in my rice cooker so I have it prepared to simply throw in a "yellow" container to measure.

These simple tips have really helped me follow this program!

Tuesday, May 27, 2014

21 Day Fix Meal Idea - Avocado Egg "Salad" Wraps

I love avocado.  Like, I could eat it everyday at every meal and be completely happy.

Alas.

However, this is a great, easy way to get it into a meal.  And bonus, for those (like me) who don't like mayonnaise, you can make a great egg "salad" lunch with avocado as a healthy substitute!


So, here's the breakdown:

1 yellow: 2 corn tortillas
1 red: 2 hard boiled eggs
1 blue: mashed avocado
1 green: baby spinach leaves

Just mash the avocado and mix into chopped up eggs.  I also added a spritz of fresh lime juice!  Lay the spinach on the tortillas (which I warmed first - corn tortillas can be a bit tough to work with), and divide the egg salad evenly between the two tortillas.

To round out the lunch, I also added a mix of strawberries and blackberries for 1 purple.

Delicious and filling!

Monday, May 26, 2014

21 Day Fix Approved Chocolate Banana Shakeology

So, in doing the 21 day fix, I realized I had to change the way I make my Shakeology.  See, I normally made mine with unsweetened almond milk, I preferred the taste over making it with water.  And while, yes, you can still do that in the 21 Day Fix, you have to swap out a yellow container to do it and that is 3x a week.

Well, that wouldn't work.

Since I have my Shakeology for breakfast most days, I thought I would try mixing it with a cup of cold, black coffee.

O.M.G.

SO good.  The coffee brings out the chocolate flavor even more!


So basically, we have this:

1 red container - 1 scoop of Chocolate Shakeology
1/2 frozen banana - 1 purple container
1 cup of cold, black coffee
About 6 ice cubes

Blend together and enjoy!